Laser cutter software RDworks v8 tutorial 11 How to Set Engraving Parameters
Hi guys, this is ken from Thunderlaser.
We learned how to deal with a photo from last lesson, now let’s see how to set the parameters for engraving before sending the file to your laser cutter.
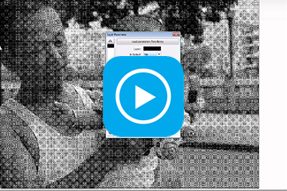
Double click the layer to popup the layer parameter dialog. Set the “is Output” as Yes. Then set the engrave speed as 700.
Then set the processing mode as “Scan”. In fact, we can only select “scan” mode if we use a BMP.
Now set the engraving power. Usually, for engraving, we will set the min power and max power the same.
If you didn’t’ tick “Invert color” in the last step, you can tick “Negative Engrave” here when engraving a transparent material.
For scan mode, you can select X_swing to get a faster speed. If you need to get a better engraving quality, you can select X_unilateralism.
Now we can set the interval. The Interval means the resolution of the engraving. The smaller the interval, the higher the resolution. Usually we will set the interval between 0.08 and 0.04. Now we can click ok and send the file to the laser cutter.
And that’s all for today. See you.